Hello friends. In
this post I am going to guide you as to how you can make a simple lock for your
phone . I will use Actionscript 2.0 here and will make a text based Typophone
lock. So let’s get started
Software
Required:
Adobe Flash CS3/CS4/CS5
Adobe Photoshop
(just in case you want to make your own graphics)
Procedure:
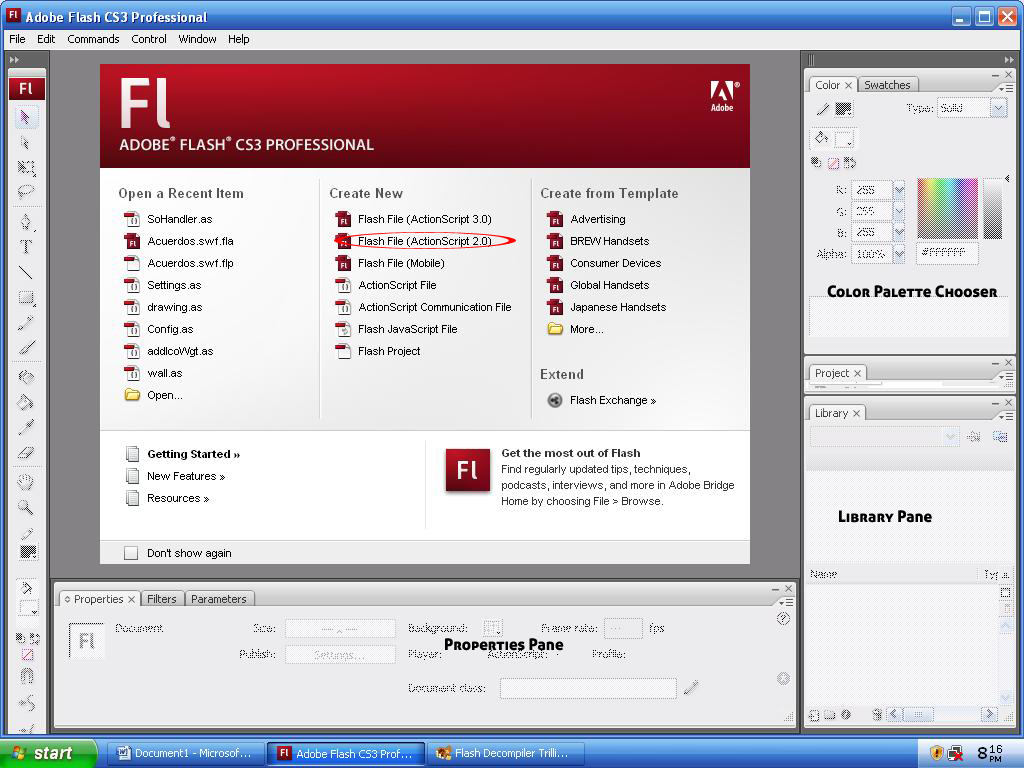
=> Open Adobe
Flash and select Flash File (Actionscript 2.0) as shown in the screenshot.
=> Set the
screen resolution as 240x400 from properties pane as the resolution of our
phone is 240x400. Also set the background color as black.
First we will
make the clock..
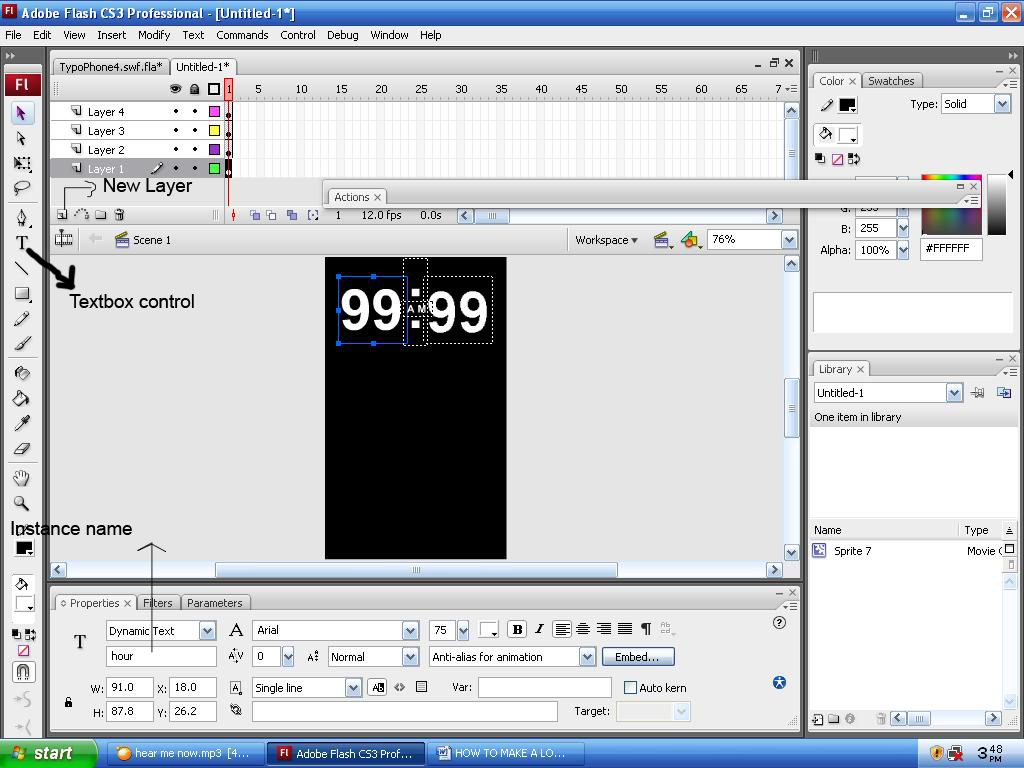
=> Take 4
text-boxes from the toolbox and put it on the workspace. Make sure that each
text box is on a different layer. Arrange it as shown in the screenshot. Write
some dummy values in the text box so as to get an idea about how the text will
look when run on phone.
=> Set the
instance name as follows:
For hour indicator => hour
For minute indicator => minute
For AM/PM Indicator => ampm
For
clarifications, look at the screenshot below
=> Now select
each text box one by one. Click “embed” in the property pane and select the
options as shown in image and press OK. It makes your swf independent of the
phone font that you use.

=> Select all
the four textboxes, right click and select “Convert To Symbol”, Check the Movie
Clip option and click OK and set the instance name of the movieclip as Clock.
=> Now your
clock movie clip is ready. Lets go and make a movie clip for Calendar.
=> Similarly
as above, take 4 text boxes on the workspace for storing date, month, year and
day. Make sure that each textbox is on a different layer. Set the font size of
the textboxes as you desire. As I have set them in a way I want to use them as
shown in screen shot.
=> Give the
instance name as follows:
For date indicator => dte
For day indicator => dy
For year indicator => yr
For month indicator => mnth
=> Now, embed
the same way as before and make another movie clip by selecting the 4 textboxes
that we are using for the purpose of making calendar. Also set the instance
name of the movieclip as Datemv.
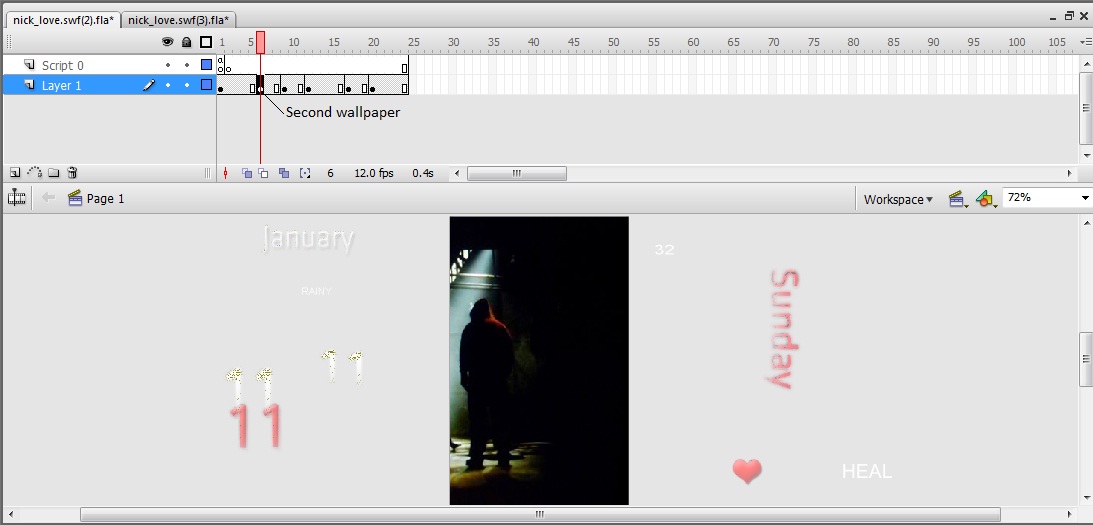
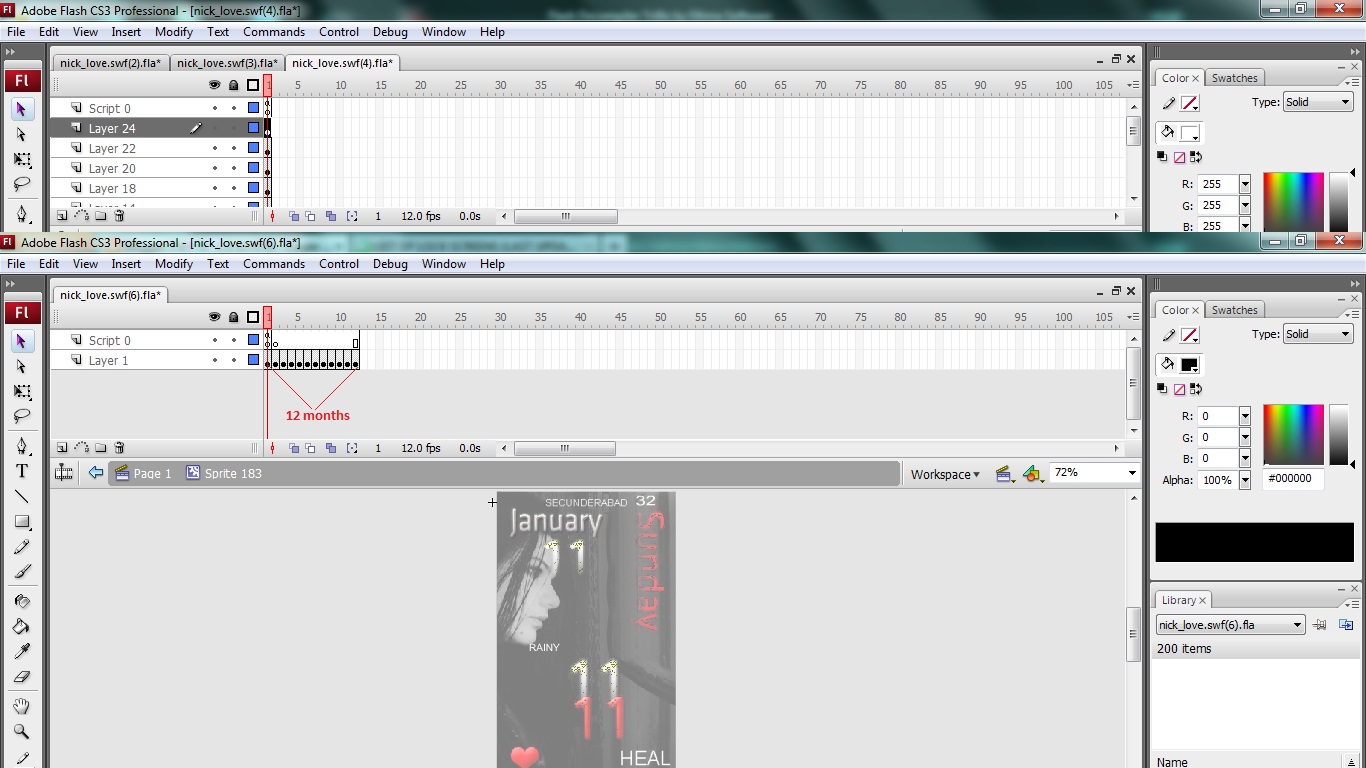
Now is the time
for having a weather movie clip. Making weather clip from scratch is a time
taking process, so just decompile any theme having weather and copy the weather
movie clip and paste it on your workspace. Double click the weather clip and
you will see that there are a series of graphics for each kind of weather
condition. You can always change it as you desire. That’s why I told you that its
better to get it from other themes. Resize the graphics as required by you in
the weather clip and you are good to go.
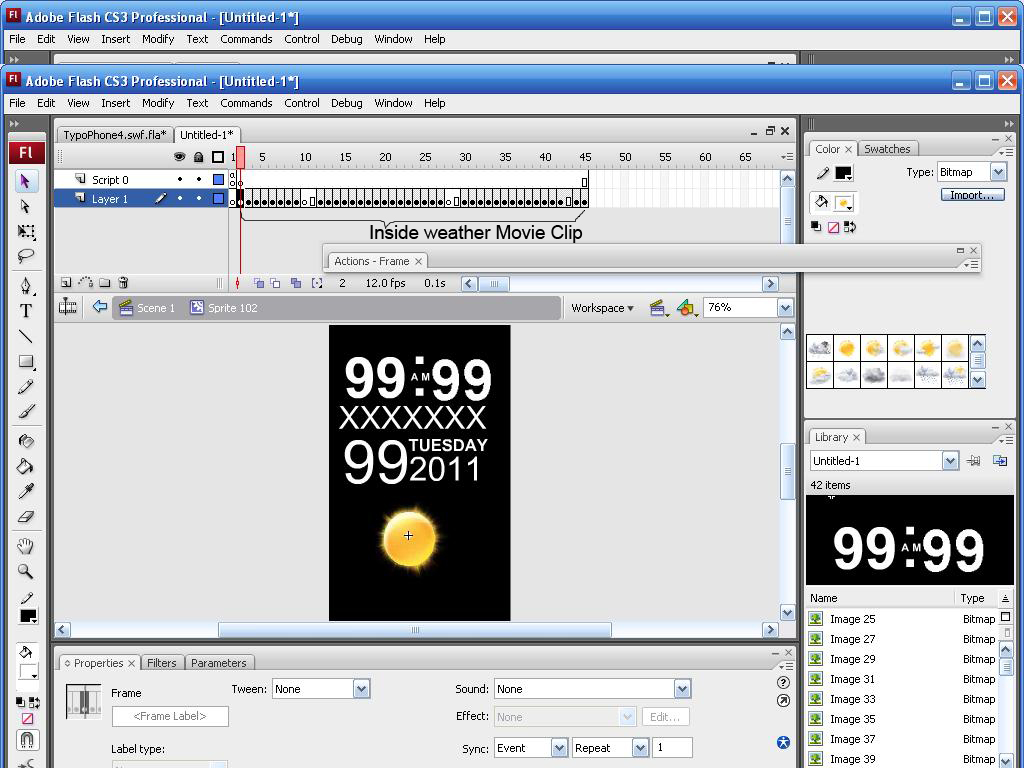
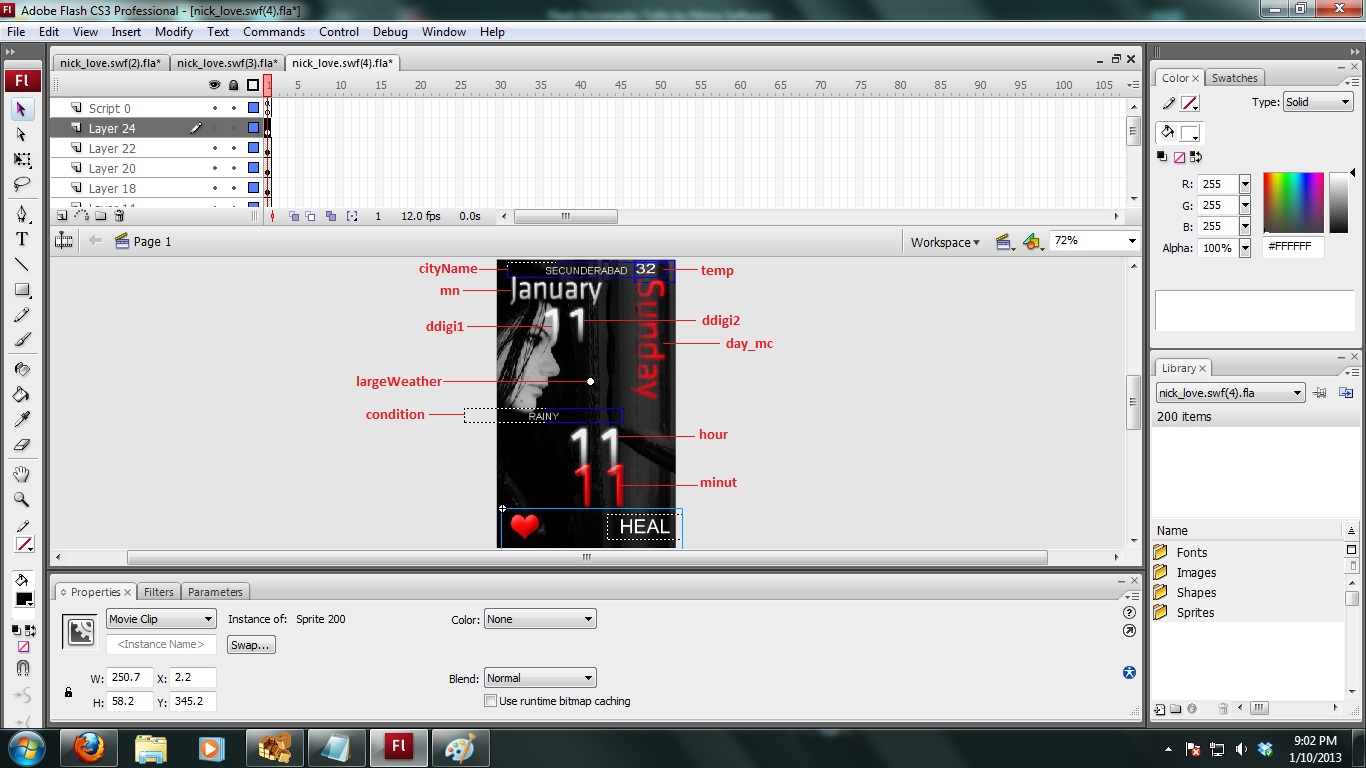
=>Now take
four text boxes for showing the temperature, city, climatic condition and
min/max forecast as shown in the screenshot below.
=> Set the
instance names as follows:
For temperature indicator => temp
For temperature condition => condition
For min/max temp => minMax
For city name => cityName
=> Now that
everything is ready, I want my lock to have slide to unlock feature, so I made
an arrow in Adobe Photoshop and dragged it on to the workspace.
=> Now right
click on the arrow and select “Convert to symbol”, check “Movie Clip” and click
OK.
=> Write a
text “UNLOCK” in text box and place it at the right side of workspace.
=> Now select
both arrow and textbox and convert it to movie clip by following the same
procedure as stated previously.
=> Now double
click this movie clip and then click on arrow movie clip so that you can see
the x and y coordinates and you can see that the x coordinate of arrow is 0 and
x coordinate of UNLOCK text is 130


=> We are
considering X coordinate only as we want the pointer to move in x direction and
not in y direction. We want the screen to get unlocked when the arrow moves
from 0 to 130. So we must be using these values in our code.
CODING:
Now as we are
done with the design part, its time to code them to perform the desired
functionality.
Select the arrow
movie clip, press f on keyboard to open code window and paste the following
code:
on(press)
{
this.startDrag(false, 0, 0,
130, 0);
}
on(releaseOutside, release)
{
stopDrag();
if (this._x == 130)
{
fscommand("send",
"KeyUnlock");
this._x = 0;
}
else
{
this._x = 0;
}
}
It means whenever we press the arrow, it should start dragging from 0
to 130. Also when the arrow is left and we have reached the coordinate 30, then
the phone must unlock otherwise it must go to the starting position i.e. x
coordinate 0.
=> As the slide is coded, we must write codes for our clock,
calendar and weather.
=> Go to the starting screen where you can see all the movie clips
by pressing the back button
=> Make a new layer and name it as “script”
=> Press F9 to open the code window and write following code in it
for Clock
function setTime()
{
var __reg2 = _root;
var __reg1 = new Date();
hour = __reg1.getHours();
minutes =
__reg1.getMinutes();
if (hour > 12)
{
hour = hour - 12;
ampm = "P M";
}
else
{
ampm = "A M";
}
if (length(hour) == 1)
{
hour = "0" +
hour;
}
if (length(minutes) == 1)
{
minutes = "0" +
minutes;
}
__reg2.Clock.hour.text =
hour;
__reg2.Clock.minute.text =
minutes;
__reg2.Clock.ampm.text =
ampm;
}
getHours() and getMinutes() are predefined functions to extract system
time. As we want to show the time in 12-hour format, whenever, hour value is
greater than 12, we subtract 12 from it and make ampm text value to PM.
Otherwise we let it remain AM. Also when hour or minute value is a 1-digit
number, we add 0 in front of it.
Then we store the respective values in the text boxes. Note that the
text box names that you use must be same as the instance name that you gave
while designing.
=> Then call the setTime() function by writing the following code in
the same code window.
setInterval(this, "setTime", 10000);
setTime();
It shows that for a span of every 10000 milliseconds, the time updates
itself.
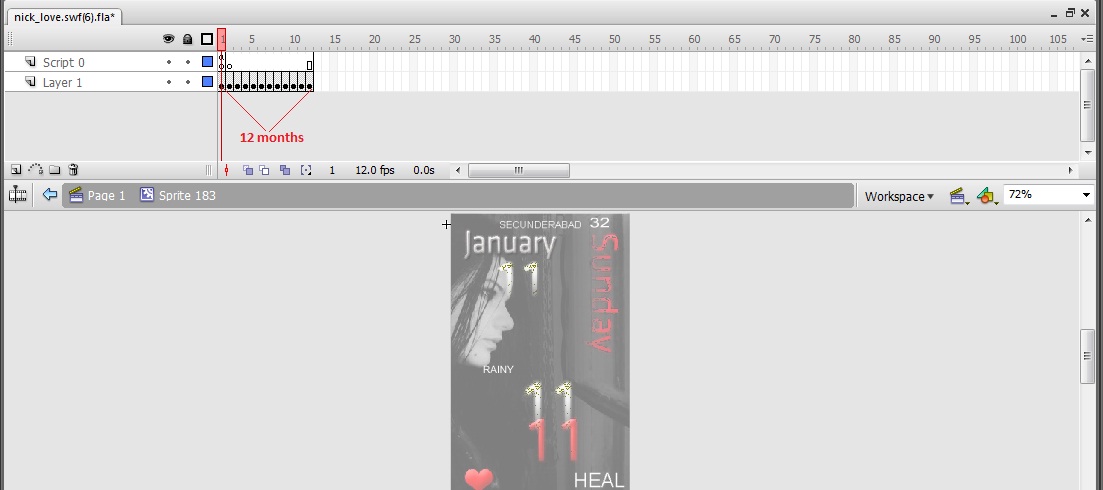
=> Now in the same code window write the code for calendar as
follows.
function dodate()
{
var __reg2 = _root;
var __reg3 = new
Array("JANUARY", "FEBRUARY", "MARCH",
"APRIL", "MAY", "JUNE", "JULY",
"AUGUST", "SEPTEMBER", "OCTOBER",
"NOVEMBER", "DECEMBER");
var __reg3 = new
Array("SUNDAY", "MONDAY", "TUESDAY",
"WEDNESDAY", "THURSDAY", "FRIDAY",
"SATURDAY");
var __reg1 = new Date();
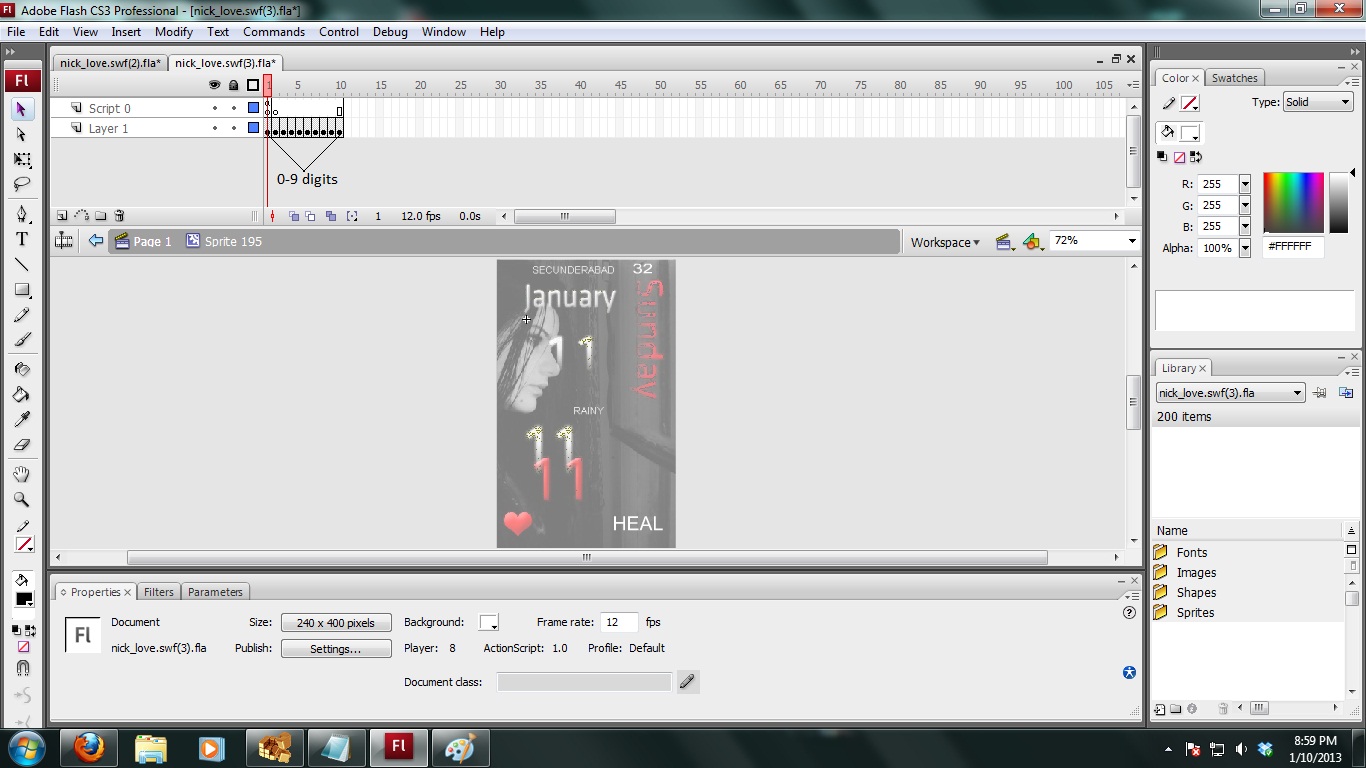
dte = __reg1.getDate();
if (dte < 10)
{
dte = "0" +
dte;
}
__reg2.Datemv.dte.text = dte;
__reg2.Datemv.dy.text =
__reg3[__reg1.getDay()];
__reg2.Datemv.mnth.text =
__reg3[__reg1.getMonth()];
__reg2.Datemv.yr.text =
__reg1.getFullYear();
}
Its very easy to understand the code as its basically nesting of arrays
to get correct value. For instance, __reg1 contains the date and dte extracts
the date value fro it. So
__reg3[__reg.getDay()] signifies that when the Day value is returned as
1 then it is matched with __reg3 array which has first value as Sunday. Similarly all the arrays work out and we
later store them in the particular text boxes.
=> Then we call the dodate() function as follows. Write the
following code in the same code window.
setInterval(this, "dodate", 500000);
dodate();
=>Now paste the following code in the same code window for weather
function prep()
{
condition._y = condition._y +
fontHeightAdjustment;
updatetime._y = updatetime._y
+ fontHeightAdjustment;
cityName._y = cityName._y +
fontHeightAdjustment;
temp._y = temp._y +
fontHeightAdjustment;
minMax._y = minMax._y +
fontHeightAdjustment;
smallWeather1.day._y =
smallWeather1.day._y + fontHeightAdjustment;
smallWeather1.minMax._y =
smallWeather1.minMax._y + fontHeightAdjustment;
smallWeather2.day._y =
smallWeather2.day._y + fontHeightAdjustment;
smallWeather2.minMax._y =
smallWeather2.minMax._y + fontHeightAdjustment;
smallWeather3.day._y =
smallWeather3.day._y + fontHeightAdjustment;
smallWeather3.minMax._y =
smallWeather3.minMax._y + fontHeightAdjustment;
smallWeather4.day._y =
smallWeather4.day._y + fontHeightAdjustment;
smallWeather4.minMax._y =
smallWeather4.minMax._y + fontHeightAdjustment;
cityName.text = city;
if (ampm)
{
var __reg2 =
updateTime.indexOf(":");
var __reg1 = parseInt(updateTime.substring(0,
__reg2));
var __reg3 =
updateTime.substring(__reg2 + 1, __reg2 + 3);
var __reg3 = __reg1 >=
12 ? "PM" : "AM";
if (__reg1 > 12)
{
__reg1 = __reg1 - 12;
}
else if (__reg1 == 0)
{
__reg1 = 12;
}
updatetime.text = __reg1
+ ":" + __reg3 + " " + __reg3;
refreshIcon._x = 43;
}
else
{
updatetime.text =
updateTime;
refreshIcon._x = 57;
}
autoUpdate();
}
function setWeather()
{
var __reg8 = new Date();
var __reg3 =
__reg8.getHours();
var __reg9 =
__reg8.getDate();
if (lastUpdateDay != __reg9
|| lastUpdateHour != __reg3)
{
var __reg11 =
__reg8.getFullYear();
var __reg10 =
__reg8.getMonth();
var __reg7 =
__reg8.getDay();
var __reg6 = __reg11 +
"/" + (__reg10 + 1) + "/" + __reg9;
lastUpdateHour = __reg3;
lastUpdateDay = __reg9;
var __reg2 = -1;
var __reg1 = 0;
while (__reg1 <
weatherDate.length && __reg2 == -1)
{
if
(weatherDate[__reg1] == __reg6)
{
__reg2 = __reg1;
if (__reg3 < 6
|| __reg3 >= 18)
{
if (__reg3
< 6 && __reg2 - 1 >= 0)
{
__reg3 =
parseInt(weatherNightState[__reg2 - 1]);
largeWeather.gotoAndStop(__reg3 + 1);
condition.text = weatherConditions[__reg3];
minMax.text = toUnits(weatherNightMin[__reg2 - 1]) + " / " +
toUnits(weatherNightMax[__reg2 - 1]) + "";
__reg6 =
(parseInt(weatherNightMin[__reg2 - 1]) + parseInt(weatherNightMax[__reg2 - 1]))
/ 2;
temp.text
= Math.round(toUnits(__reg6)) + "";
}
else
{
__reg3 =
parseInt(weatherNightState[__reg2]);
largeWeather.gotoAndStop(__reg3
+ 1);
condition.text = weatherConditions[__reg3];
minMax.text = toUnits(weatherNightMin[__reg2]) + " / " +
toUnits(weatherNightMax[__reg2]) + "";
__reg6 =
(parseInt(weatherNightMin[__reg2]) + parseInt(weatherNightMax[__reg2])) / 2;
temp.text
= Math.round(toUnits(__reg6)) + "";
}
}
else
{
__reg3 =
parseInt(weatherDayState[__reg2]);
largeWeather.gotoAndStop(__reg3 + 1);
condition.text = weatherConditions[__reg3];
minMax.text =
toUnits(weatherDayMin[__reg2]) + " / " +
toUnits(weatherDayMax[__reg2]) + "";
__reg6 =
(parseInt(weatherDayMin[__reg2]) + parseInt(weatherDayMax[__reg2])) / 2;
temp.text =
Math.round(toUnits(__reg6)) + "";
}
__reg1 = 1;
while (__reg1
<= 4)
{
if (__reg2 +
__reg1 < daysOfData)
{
__reg3 =
parseInt(weatherDayState[__reg2 + __reg1]);
this["smallWeather" + __reg1].gotoAndStop(__reg3 + 1);
var
__reg4 = __reg7 + __reg1;
if
(__reg4 > 6)
{
__reg4 = __reg4 - 7;
}
this["smallWeather"
+ __reg1].day.text = days[__reg4];
this["smallWeather" + __reg1].minMax.text =
toUnits(weatherDayMin[__reg2 + __reg1]) + "/" +
toUnits(weatherDayMax[__reg2 + __reg1]) + "";
}
else
{
this["smallWeather" + __reg1].gotoAndStop(1);
this["smallWeather" + __reg1].day.text = "";
this["smallWeather" + __reg1].minMax.text = "";
}
++__reg1;
}
}
++__reg1;
}
if (__reg2 == -1)
{
cityName.text =
"weather.txt file is out of date!";
}
}
}
function toUnits(celcius)
{
return farenheit ?
Math.round(celcius * 9 / 5 + 32) : celcius;
}
function autoUpdate()
{
this.onEnterFrame = function
()
{
if (time < 3)
{
++time;
return undefined;
}
setWeather();
time = 0;
}
;
}
function load_xml()
{
var __reg3 = false;
xml = new XML();
xml.ignoreWhite = true;
xml.onLoad = function
(success)
{
if (success)
{
city =
xml.firstChild.firstChild.attributes.Loc;
if (city ==
undefined)
{
cityName.embedFonts = true;
cityName.text =
"weather.txt file is corrupted!";
}
else
{
cityID =
xml.firstChild.firstChild.attributes.LocID;
updateDate =
xml.firstChild.firstChild.attributes.UpdateDate;
updateTime =
xml.firstChild.firstChild.attributes.UpdateTime;
daysOfData =
xml.firstChild.firstChild.childNodes.length;
var __reg1 = 0;
while (__reg1
< daysOfData)
{
weatherDate[__reg1] =
xml.firstChild.firstChild.childNodes[__reg1].attributes.StartDate;
weatherDayState[__reg1] = xml.firstChild.firstChild.childNodes[__reg1].childNodes[0].attributes.State;
weatherDayMin[__reg1] =
xml.firstChild.firstChild.childNodes[__reg1].childNodes[0].firstChild.attributes.Min;
weatherDayMax[__reg1] =
xml.firstChild.firstChild.childNodes[__reg1].childNodes[0].firstChild.attributes.Max;
weatherNightState[__reg1] =
xml.firstChild.firstChild.childNodes[__reg1].childNodes[1].attributes.State;
weatherNightMin[__reg1] =
xml.firstChild.firstChild.childNodes[__reg1].childNodes[1].firstChild.attributes.Min;
weatherNightMax[__reg1] =
xml.firstChild.firstChild.childNodes[__reg1].childNodes[1].firstChild.attributes.Max;
++__reg1;
}
prep();
}
}
else
{
cityName.embedFonts =
true;
cityName.text =
"weather.txt file not found!";
}
__reg0 = undefined;
__reg1 = undefined;
return __reg0;
}
;
xml.load(this._url.slice(0,
this._url.lastIndexOf("/")) + "/weather.txt");
}
var city;
var cityID;
var updateDate;
var updateTime;
var daysOfData;
var weatherDate;
var weatherDayState;
var weatherDayMin;
var weatherDayMax;
var weatherNightState;
var weatherNightMin;
var weatherNightMax;
var fontHeightAdjustment =
this._parent._parent._parent.fontHeightAdjustment;
var model = this._parent._parent._parent.model;
var theme = this._parent._parent._parent.theme;
var time = 0;
var farenheit = this._parent._parent._parent.temperatureUnit ==
"F" ? true : false;
var ampm = this._parent._parent._parent.ampm ? true : false;
var lastUpdateHour = -1;
var lastUpdateDay = -1;
var daysOfData = 0;
var days;
var weatherConditions;
if (theme == "HTCHero")
{
days =
this._parent._parent._parent.widgetLang_ShortDays;
weatherConditions =
this._parent._parent._parent.widgetLang_WeatherStates;
city =
this._parent._parent._parent.city;
if (city == undefined)
{
cityName.embedFonts =
true;
cityName.text =
"weather.txt file not found!";
}
else
{
cityID =
this._parent._parent._parent.cityID;
updateDate =
this._parent._parent._parent.updateDate;
updateTime =
this._parent._parent._parent.updateTime;
daysOfData =
this._parent._parent._parent.daysOfData;
weatherDate =
this._parent._parent._parent.weatherDate;
weatherDayState =
this._parent._parent._parent.weatherDayState;
weatherDayMin =
this._parent._parent._parent.weatherDayMin;
weatherDayMax =
this._parent._parent._parent.weatherDayMax;
weatherNightState =
this._parent._parent._parent.weatherNightState;
weatherNightMin =
this._parent._parent._parent.weatherNightMin;
weatherNightMax =
this._parent._parent._parent.weatherNightMax;
prep();
}
}
else
{
days = new
Array("Sun", "Mon", "Tue", "Wed",
"Thu", "Fri", "Sat");
weatherConditions = new
Array("Sunny", "Mostly Sunny", "Partly Sunny",
"Intermittent Clouds", "Hazy Sunshine", "Mostly
Cloudy", "Cloudy", "Dreary", "",
"", "Fog", "Showers", "Mostly Cloudy with
Showers", "Partly Sunny with Showers", "Thunderstorms",
"Mostly Cloudy with Thunder Showers", "Partly Sunny with Thunder
Showers", "Rain", "Flurries", "Mostly Cloudy with
Flurries", "Partly Sunny with Flurries", "Snow", "Mostly
Cloudy with Snow", "Ice", "Sleet", "Freezing
Rain", "", "", "Rain and Snow",
"Hot", "Cold", "Windy", "Clear",
"Mostly Clear", "Partly Cloudy", "Intermittent
Clouds", "Hazy", "Mostly Cloudy", "Partly Cloudy
with Showers", "Mostly Cloudy with Showers", "Partly Cloudy
with Thunder Showers", "Mostly Cloudy with Thunder Showers",
"Mostly Cloudy with Flurries", "Mostly Cloudy with Snow");
weatherDate = new Array();
weatherDayState = new
Array();
weatherDayMin = new Array();
weatherDayMax = new Array();
weatherNightState = new
Array();
weatherNightMin = new Array();
weatherNightMax = new
Array();
load_xml();
}
Don’t bother about the code as you can re-use it again and again. Now
that everything is ready, you must publish your swf. Goto File-> Publish Settings and set the path where you want your
file to be published and click publish. Atlast this is what we get

Download updated weather file for your city from http://weather.joeearl.co.uk. Place it
at the same position as your published swf file and double click your swf to
get the result of your work.
I hope this tutorial helped you in understanding how to work with Actionscript. For any queries or assistance. Leave a comment and I will help you.

.jpg)


 TUTORIAL 1_files/1(1).JPG)
 TUTORIAL 1_files/Telangana.JPG)
 TUTORIAL 1_files/aiku.jpg)
 TUTORIAL 1_files/Agni_V_Launch.jpg)
 TUTORIAL 1_files/India+Grunge+Flag.jpg)
 TUTORIAL 1_files/baby-born-with-6-legs.jpg)
 TUTORIAL 1_files/Star_Trek_PADD(1).jpg)
how to make a maze lock or pattern lock.. with a resolution 240x320 ?
ReplyDeleteWhat if I have a missed call or recieved a message,
ReplyDeletehow could I add an indicator on the lockscreen to show how many calls that I've missed and how many unread messages I got?
what is the code for that one?
That feature is not supported in STAR's lockscreens
DeleteI think you need AS3 and the bada flash extensions for this.. :)
ReplyDeletehttp://developer.bada.com/library/Live-Wallpaper-and-Lockscreen-development-using-Flash
There is no need of any extension.. Actionscript 2.0 is enough
Deletehey dude, did all tutorial, but it does not unlock any way this script is correct?
ReplyDeleteYes the script is correct..
DeleteHere's how, http://sta.sh/0tdlfpgl7c3 in my wave y, not unlock the screen :(
DeleteThe unlock scropt in this tutorial is meant for Samsung Star. You need to replace it with the unlock script for Wave
Deleteand you know what is the code? but do not find anything on google.
DeleteNo idea about that...
Deletesir nick can you make a tutorial (lockscreen) for corby 2 ?
ReplyDeleteI am not aware if corby 2 supports flashlite... These locks will work on corby 1 though
Deletei'm getting errors in code..
ReplyDeletefunction setTime(), function dodate()
can you tell me whats the problem in that..
What's the error you are getting??
Deletefunction setTime() on/oneventhandler error occurred.
Deleteand same error for function dodate().
and also tell me how to download "http://darkforestgroup.com/starmod/index.php?topic=1522.msg20139#msg20139"
this lock screens?